
That gap between your mattress and the floor isn’t dead space — it’s a storage unit you’re not paying rent for.
Most bedrooms are quietly hemorrhaging square footage under the bed. It just sits there, collecting dust bunnies and the occasional sock, while your closet bulges and your hallway fills with boxes you don’t know where to put. The good news: you don’t need a bigger apartment. You need a better plan for the space you already have.
Below, you’ll find 25 genuine DIY ideas for transforming under-bed space into organised, accessible storage — from five-minute zero-tool hacks to weekend woodworking builds. There’s something here for every clearance height, every budget (including free), and every skill level from ‘I own a hammer’ to ‘I have a drill press.’ Whether your bed is 4 inches off the floor or 14, you’ll leave with a specific plan to act on.
Before you scroll: measure your clearance first. Kneel beside the bed and slide a ruler under the frame. Standard containers fit best with 6–7 inches of clearance, but several ideas below are built specifically for beds with under 5 inches.
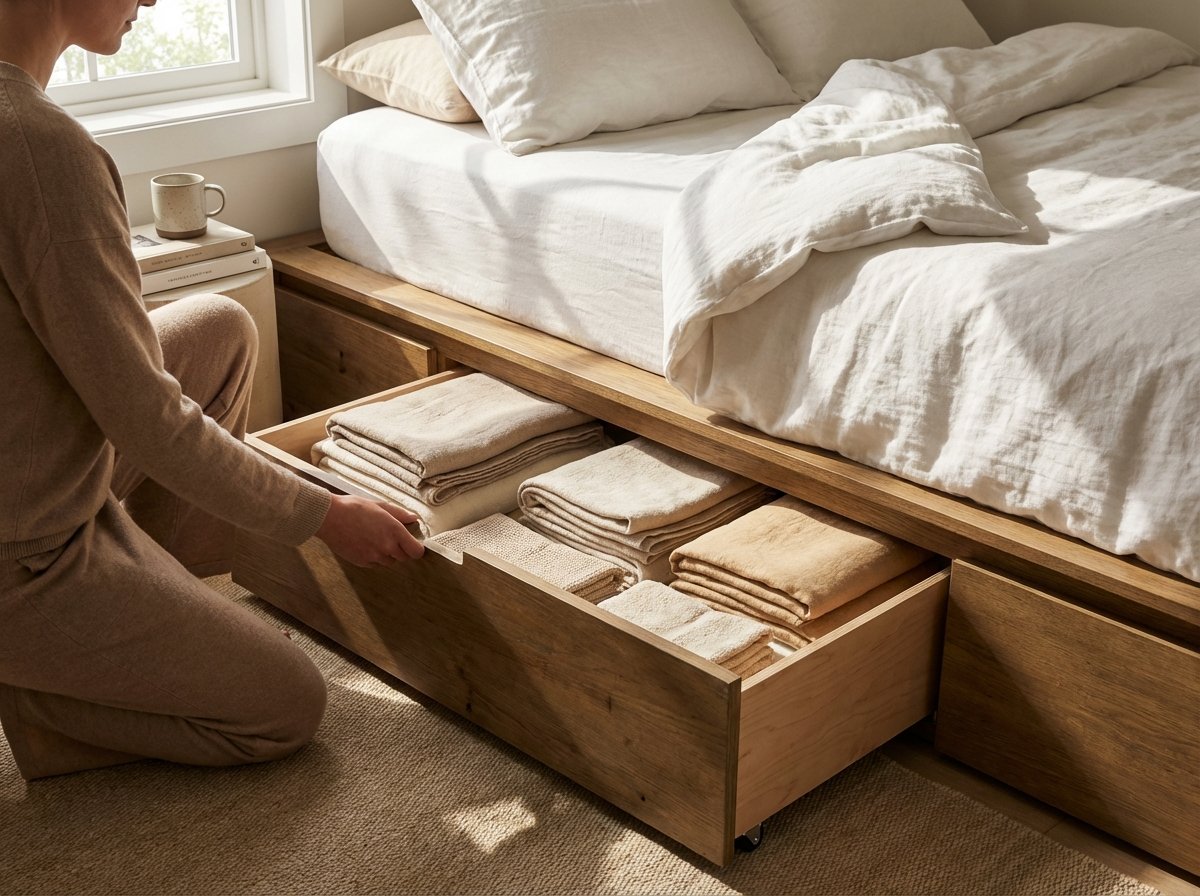
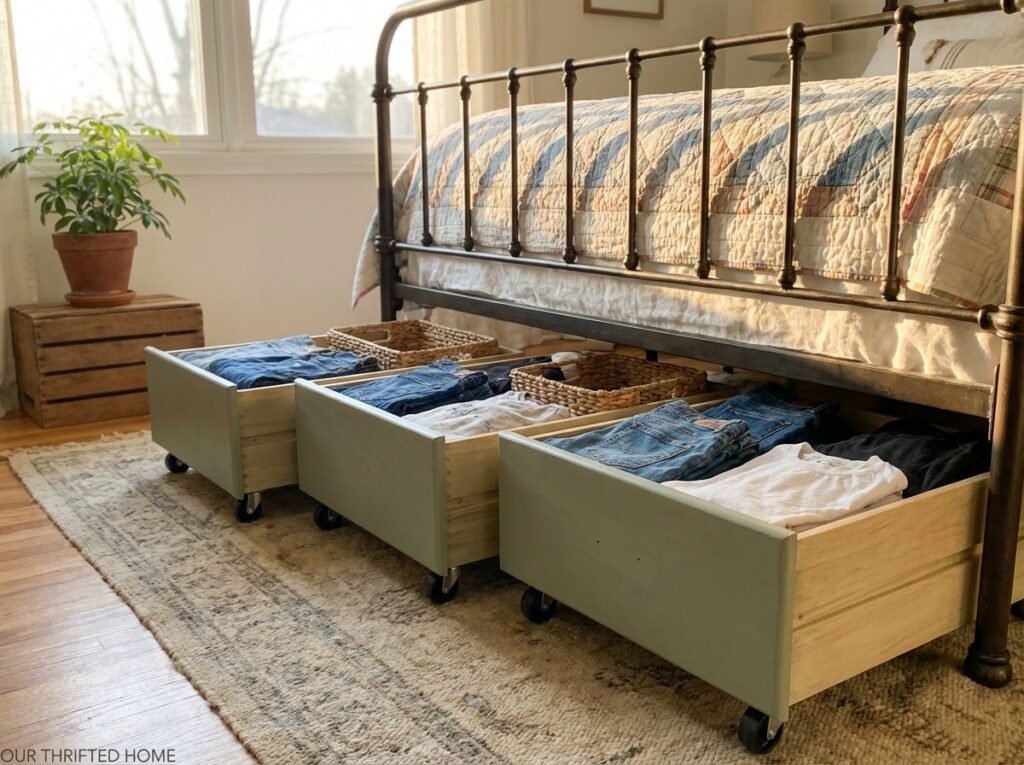
1. DIY Rolling Plywood Storage Drawer
What it is: A custom-built wooden drawer on caster wheels, sized exactly to fit your under-bed clearance.
Why it works: Store-bought bins are built to fit average beds. Yours probably isn’t average. Building your own means every millimetre of your actual clearance gets used — no wasted vertical space.
How to build it: Cut a plywood base and four sides to your measured dimensions. Sand all edges. Pre-drill holes and attach sides with 1¼-inch wood screws and wood glue at the joins. Attach four swivel casters (3/4-inch or 1-inch low-profile) to the base. Paint or stain before assembly for even coverage. Add a drawer pull or rope handle at the front.
Best for: Seasonal clothing, extra bedding, shoes.
Experience signal: Woodworkers consistently find that adding the casters before final assembly — not after — is the move that prevents frustrating under-clearance surprises.
Pro tip: Cut the front panel 1/4 inch shorter than the actual clearance so it slides easily even on thick rugs.
Cost: $20–$45 depending on plywood grade and caster quality. [Web-verified: April 2026]
[Link opportunity: ‘swivel casters’ → product link or hardware store roundup]
[Affiliate disclosure required if this link is monetised — add site-wide or inline disclosure before publishing]
2. IKEA Basket Hack with Caster Wheels
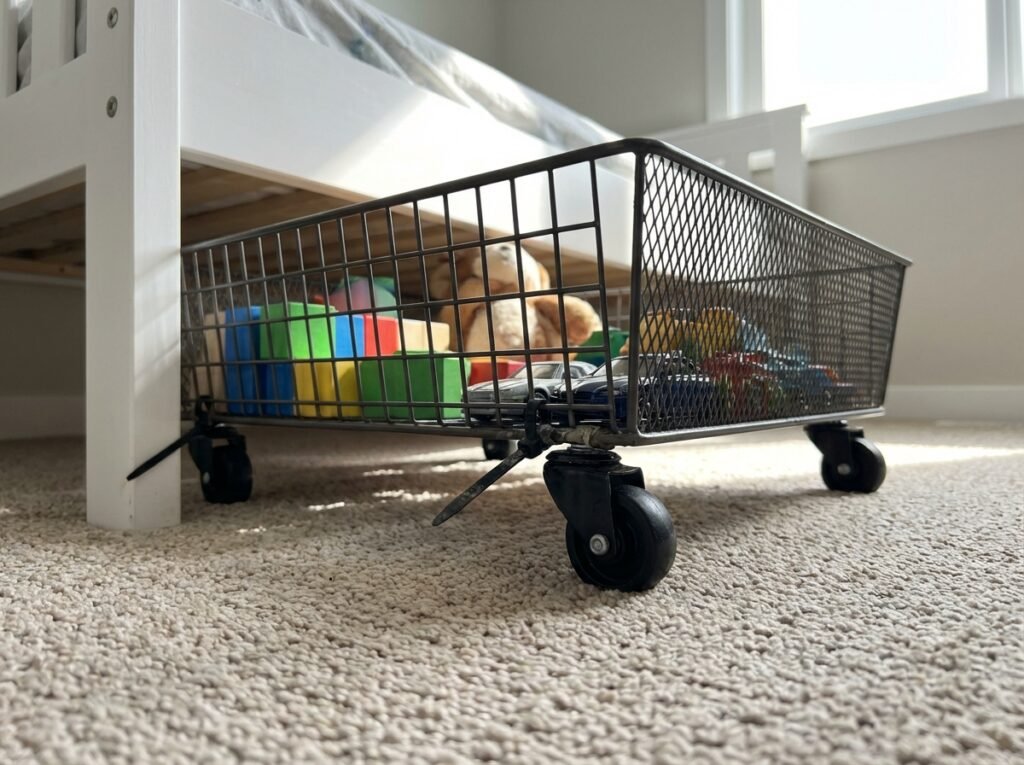
What it is: A no-tools, 10-minute hack — attach caster wheels to the bottom of any IKEA wire mesh basket using zip ties.
Why it works: The basket becomes a rolling bin that pulls out from under the bed with a single finger. No drilling. No wood. Works on carpet and hardwood alike.
How to do it: Flip your basket upside down. Position a swivel caster at each corner. Thread two zip ties through the basket mesh and through the caster mounting holes. Pull tight. Flip right-side up. Done. The IKEA GABBIG or KROKEN baskets work especially well for this.
Best for: Kids’ rooms (toys, shoes), dorm rooms, renters who can’t make permanent modifications.
Experience signal: Those who’ve tried this consistently report that using two zip ties per caster — not one — is the difference between a wobbly bin and a rock-solid one.
Pro tip: Go for swivel casters rated at 20 lbs or more. The cheap 10-lb ones from general stores fail quickly under a loaded basket.
Cost: $5–$15 total (basket $6–$10, four casters $4–$8). [Web-verified: April 2026]
[Link opportunity: ‘swivel caster’ → hardware product link]
[Affiliate disclosure required if this link is monetised — add site-wide or inline disclosure before publishing]
3. Repurposed Picture Frame Drawer on Casters
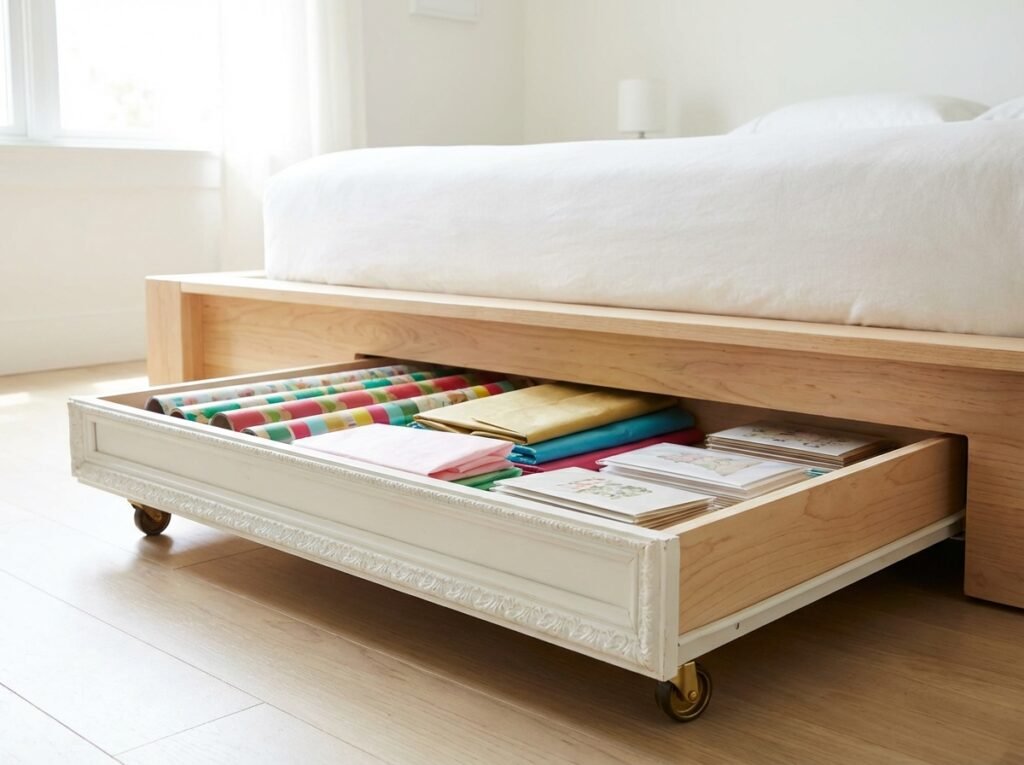
What it is: A shallow rolling drawer built from picture frame moulding — giving you storage with a decorative front edge.
Why it works: Picture frame moulding is cheap, pre-routed, and gives the finished drawer a polished look that plain plywood can’t match. Great for low-clearance beds where a shallow box is all you have room for.
How to build it: Buy picture frame moulding in lengths from any hardware or craft store. Cut mitre corners, assemble into a rectangle with wood glue and corner brackets. Staple or nail a thin plywood or MDF sheet across the bottom. Add four low-profile casters.
Best for: Flat items — gift wrap, documents, seasonal decoration, flat shoes.
Experience signal: This is the hack that consistently surprises people — it looks far more considered than a plain bin and costs about the same.
Pro tip: Paint the moulding before assembly. Painting in the corners after assembly is fiddly and the finish suffers.
Cost: $15–$30 for materials. [Web-verified: April 2026]
4. Contact Paper Cardboard Bin
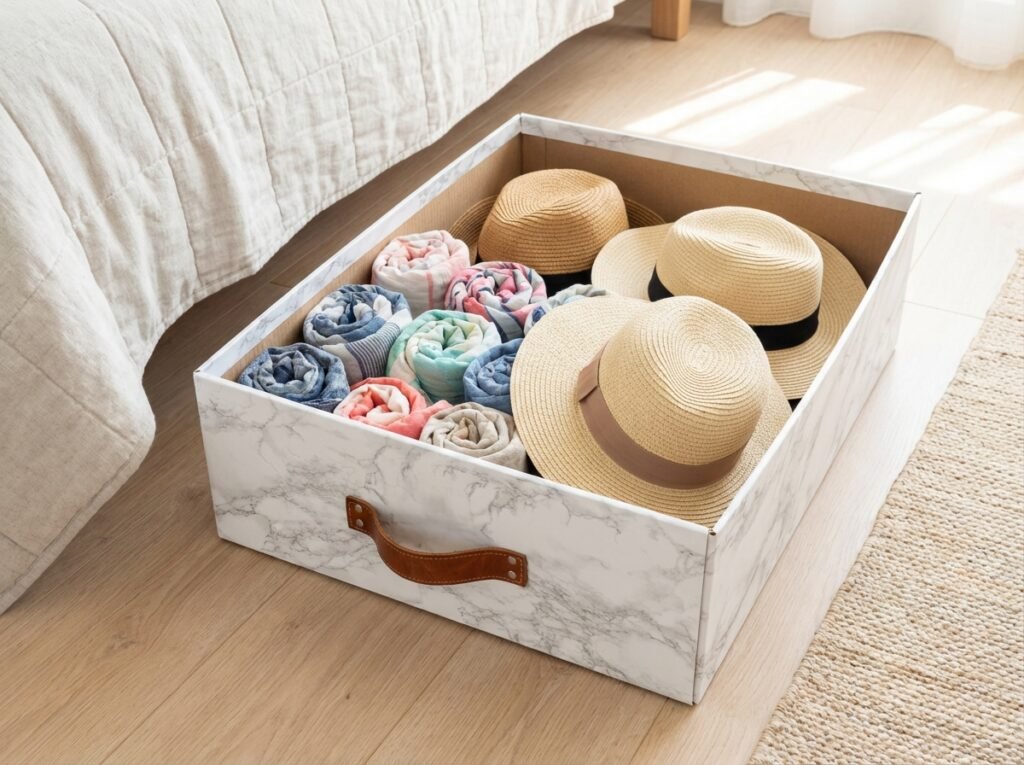
What it is: A heavy-duty cardboard shipping box wrapped in adhesive contact paper and used as a pull-out storage tray under the bed.
Why it works: Free to make if you have moving boxes. Surprisingly sturdy for light items. Completely customisable — any colour, any pattern, any size.
How to do it: Source a flat-pack shipping box. Score and fold to your desired height. Reinforce the base and corners with packing tape inside and out. Wrap the exterior in contact paper (marble, linen, or solid colours all look great). Add a leather or ribbon pull handle at the front.
Best for: Lightweight seasonal items — summer clothes, Christmas decorations, extra pillows.
Experience signal: Renters consistently rate this as the best entry point because there’s nothing to lose — if it doesn’t work, you recycle the box and try something else.
Pro tip: Store items inside zip-up fabric bags first to protect against the very slight moisture risk with cardboard over time.
Cost: $0–$8 (contact paper $5–$8, box usually free from moving/delivery). [Web-verified: April 2026]
5. Bed Risers Plus Stackable Container System
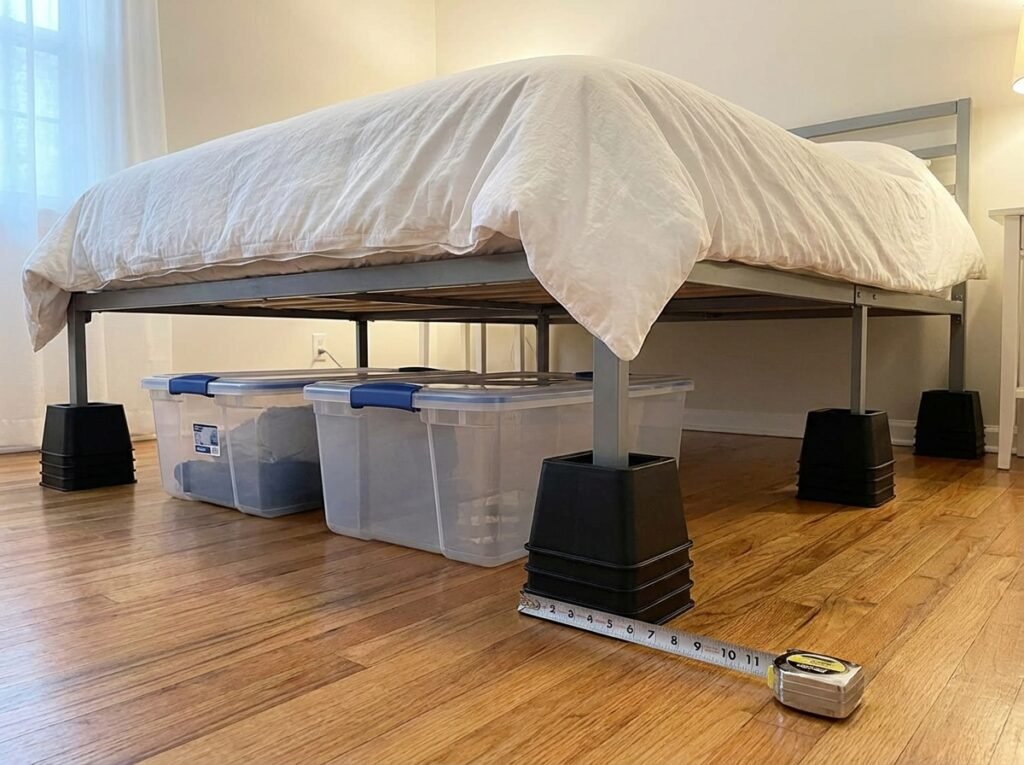
What it is: Raise your entire bed 3–8 inches using bed risers, then build a customised tiered container system in the newly created space.
Why it works: If your current clearance is only 4–5 inches, risers unlock a whole new storage tier — suddenly you can fit standard containers, small bins stacked two high, or rolling drawers that weren’t possible before.
How to do it: Measure your current clearance. Buy adjustable risers at the height you need (3-inch, 5-inch, or 8-inch options are all widely available). Stack them to reach the exact height that works for your storage containers. Use risers rated at minimum 300 lbs per leg — cheap lightweight ones wobble.
Best for: Anyone with low-clearance platform beds or divan-style frames.
Experience signal: The most common mistake is buying risers without checking whether the bed legs are round or square — confirm the shape before purchasing, as risers are leg-specific.
Pro tip: Mainstays and Utopia Bedding both make reliable risers in the $10–$20 range that hold up to 1,300 lbs total. Skip anything rated under 800 lbs.
Cost: Risers $10–$20 (4-pack). Containers additional. [Web-verified: April 2026]
[Link opportunity: ‘adjustable bed risers’ → product roundup or affiliate]
[Affiliate disclosure required if this link is monetised — add site-wide or inline disclosure before publishing]
6. Old Dresser Drawers Repurposed as Under-Bed Units
What it is: Salvage the individual drawers from an old chest of drawers — thrifted, found curbside, or pulled from a damaged piece — and give them caster wheels for use as under-bed bins.
Why it works: Dresser drawers are literally designed to be storage containers. They’re already the right depth, already have a finished front, and often come with hardware holes for pulls. They just need wheels.
How to do it: Source drawers from a thrift store ($3–$10 each), a Facebook Marketplace freebie, or a piece of furniture you no longer need. Sand, paint, or stain the exterior. Attach low-profile swivel casters to the bottom. Add a new handle if the existing one is missing or worn.
Best for: Clothing, shoes, craft supplies — anything that would have lived in a dresser anyway.
Experience signal: People who’ve done this consistently say the ‘before’ photo looks like junk and the ‘after’ looks intentional — especially if you match the paint to your bed frame.
Pro tip: Check the drawer height at the thrift store against your clearance measurement before you buy. Bring a tape measure.
Cost: $5–$20 per drawer including casters. Often nearly free with curbside finds. [Web-verified: April 2026]
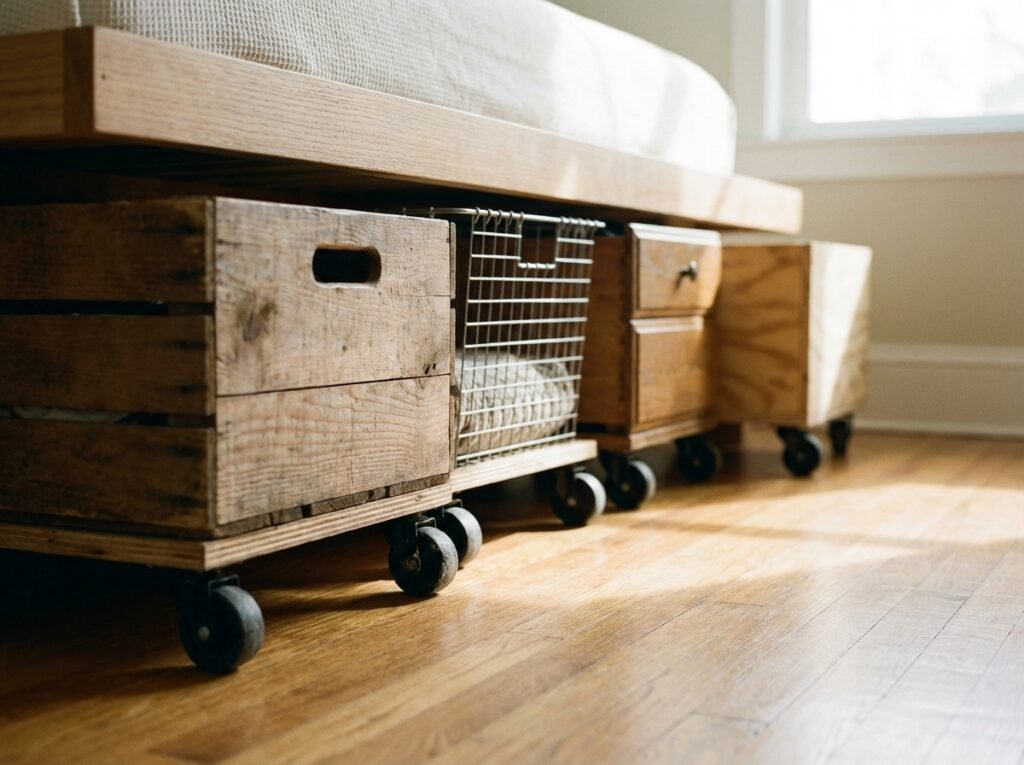
7. Repurposed Wooden Crates on Casters
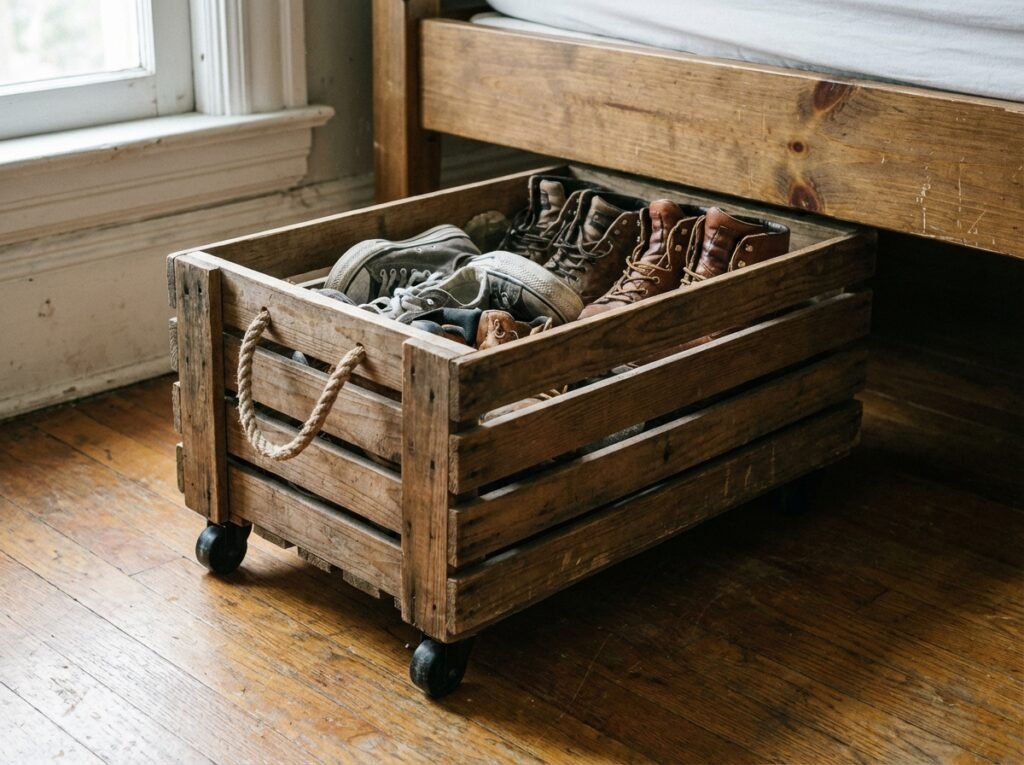
What it is: Standard wine crates, produce crates, or wooden craft crates fitted with caster wheels and used as open rolling storage bins.
Why it works: Wooden crates are naturally slatted, which means excellent airflow — ideal for shoes, leather goods, or anything that shouldn’t sit in a sealed container.
How to do it: Sand the crate interior smooth (rough wood grabs fabric). Apply a coat of wood stain or chalk paint. Screw four low-profile swivel casters to the base. Add a rope or leather handle at one end for pulling. Wine merchants and grocery stores often give crates away for free.
Best for: Shoes, craft supplies, sports gear, kids’ toys.
Experience signal: The open slat design of wooden crates is actually better than solid bins for shoes and leather goods — it lets air circulate and prevents the musty smell that sealed containers can develop over months.
Pro tip: Line the base of the crate with a piece of felt cut to size — it protects items from splinters and makes sliding things in and out much smoother.
Cost: $0–$15 (crates often free; casters $5–$10). [Web-verified: April 2026]
8. PVC Pipe Rolling Shoe Rack
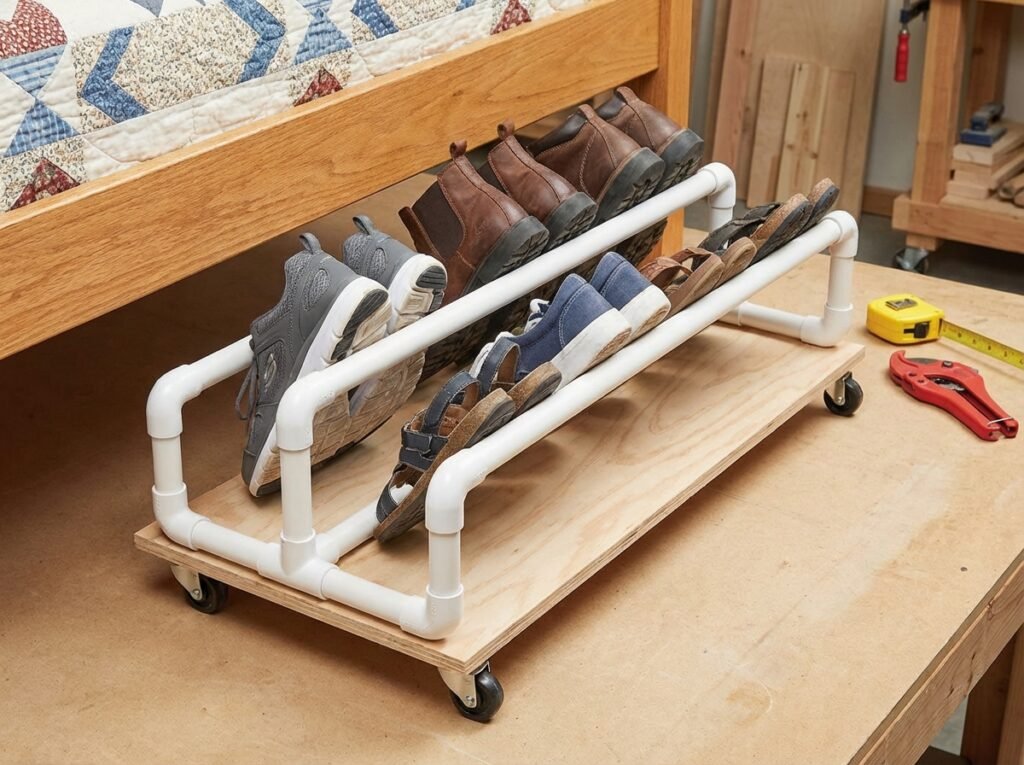
What it is: A custom shoe rack built from PVC pipe connectors and mounted on a flat rolling base — sized to fit exactly under your bed.
Why it works: Shoes are one of the most common under-bed storage challenges. Commercial shoe racks are rarely the right dimensions. This lets you build precisely the rack you need for your footwear and your clearance.
How to build it: Cut PVC pipes to equal lengths (diameter depends on shoe size — 1.5-inch diameter pipe works for most adults). Arrange pairs of parallel rails on a plywood base cut to your bed’s width. Secure rails with PVC elbows glued to the base board. Add casters. Shoes rest with their toes or heels propped on the lower rail.
Best for: Shoe storage for 6–12 pairs, depending on bed width.
Experience signal: People who’ve built PVC shoe racks consistently note that the system works best when you store shoes toe-first (angled slightly down) — they’re easier to grab and don’t fall off the rails.
Pro tip: Spray-paint the pipes before assembly — raw PVC pipe looks industrial; white or black paint transforms it.
Cost: $15–$30 for materials. [Web-verified: April 2026]
9. DIY Vacuum Bag Seasonal Storage System
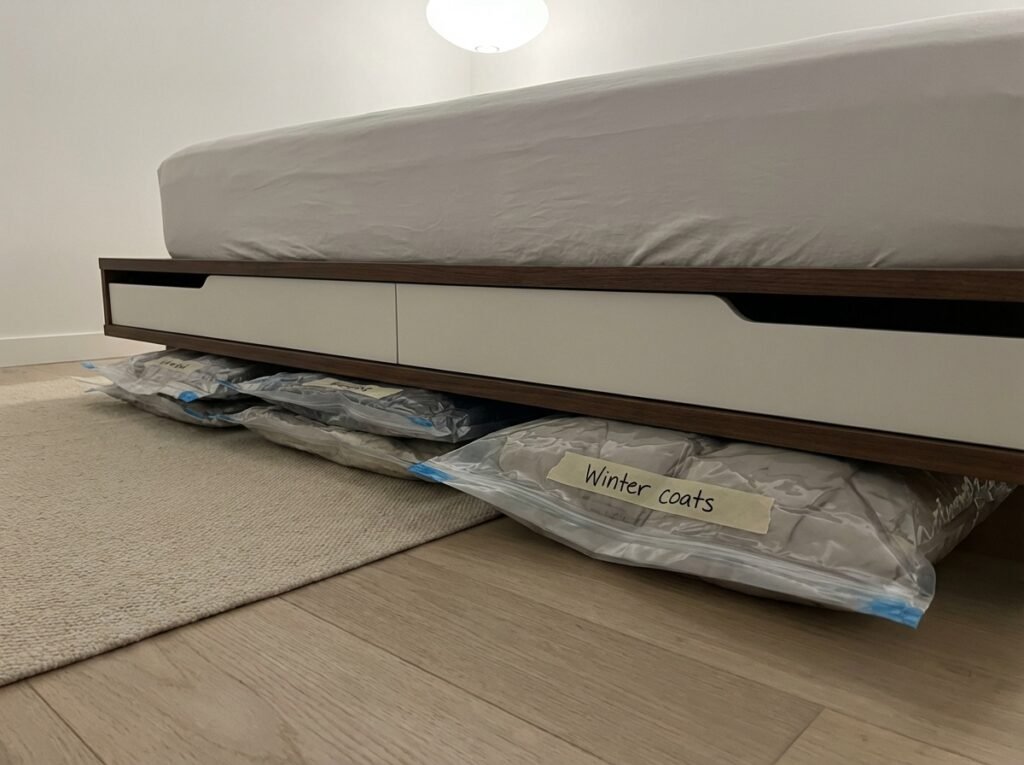
What it is: Use vacuum storage compression bags to shrink bulky bedding and seasonal clothing to a fraction of their size, then slide them flat under the bed.
Why it works: A king-size duvet vacuum-sealed goes from 8 inches thick to under 2 inches. This is genuinely transformative for low-clearance beds where nothing else fits.
How to do it: Fill each bag with clean, dry items. Seal the zip-lock closure. Attach a vacuum cleaner hose to the valve and run until the bag is flat. Slide under the bed. Label each bag with masking tape and a marker so you know what’s inside without reopening it.
Best for: Winter coats, spare duvets, extra pillows, bulky jumpers.
Experience signal: Items come out wrinkle-free more reliably when they’re loosely folded rather than stuffed in — overpacking causes compression creases.
Pro tip: Don’t vacuum-seal wool or cashmere items long-term. Compression can permanently damage the fibres. Use breathable fabric bags for delicate materials instead.
Cost: $15–$25 for a pack of 6 compression bags. [Web-verified: April 2026]
[Link opportunity: ‘vacuum storage bags’ → product roundup or affiliate]
[Affiliate disclosure required if this link is monetised — add site-wide or inline disclosure before publishing]
10. DIY Flat Zippered Fabric Bags
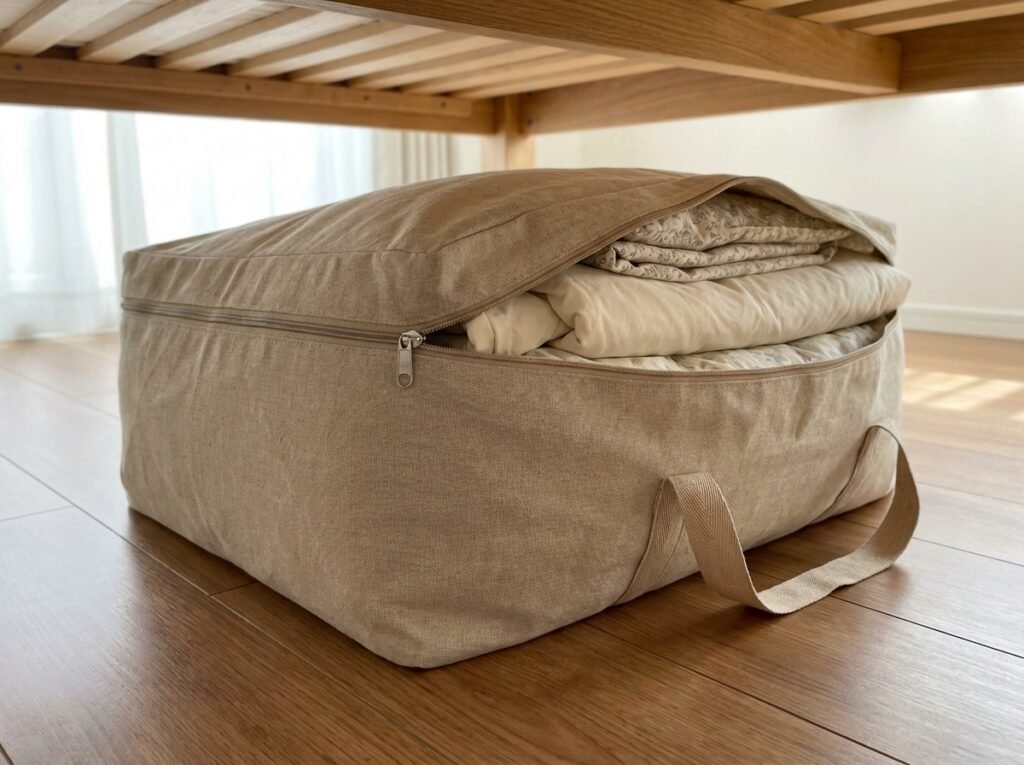
What it is: Sew or buy flat fabric storage bags with zippers that lie horizontal under the bed like a giant envelope.
Why it works: Fabric bags conform to the exact space you have — they don’t have rigid sides that waste clearance. And unlike plastic bins, they protect fabric items from dust without trapping moisture.
How to do it (sew): Cut two rectangles of canvas or heavy linen to your desired dimensions (typically 40 x 20 inches). Sew around three sides. Insert a 36-inch zipper along the fourth. Add a loop of ribbon or webbing at each end as handles. Reinforce corners with bar tacks.
Best for: Bed linens, tablecloths, seasonal throws, folded clothing.
Experience signal: A well-made flat fabric bag is the most space-efficient under-bed solution for bedding — it can hold a full sheet set and duvet cover while sitting only 3 inches high when full.
Pro tip: Use a light-coloured canvas so dust is visible and you know when to give the bag a shake before pulling things out.
Cost: $5–$15 in materials if sewing; $15–$30 to buy a similar product ready-made. [Web-verified: April 2026]
11. DIY Platform Bed with Built-In Cubbies
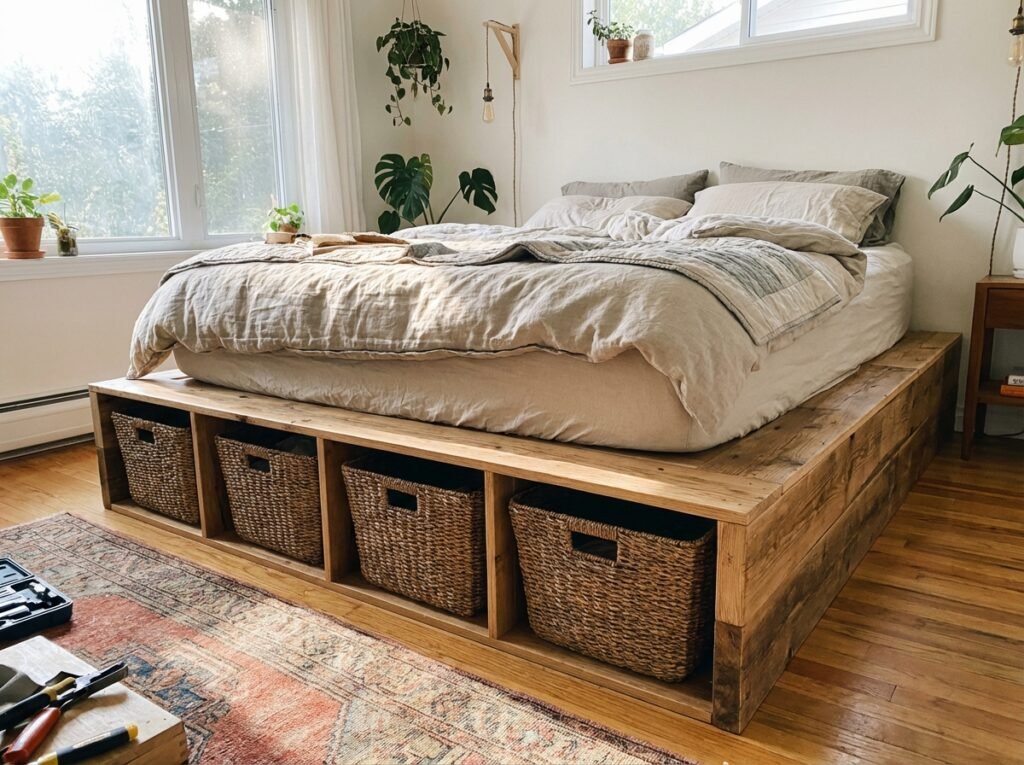
What it is: Build a simple platform bed frame from scratch with open rectangular cubbies built directly into the base — no drawers, just open storage bays accessible from the side.
Why it works: Open cubbies are faster to access than drawers, work at any bed height, and can accommodate bins, baskets, or bare shelves depending on what you store. This is the build that makes the biggest long-term difference.
How to build it: Build a perimeter frame from 2×6 lumber. Add cross braces at 12-inch intervals for mattress support. Divide the interior space into four to six equal bays using vertical plywood dividers. Leave the bays open at the sides or add simple fabric curtains for a cleaner look. Sand, paint or stain.
Best for: Serious organisers who want a permanent, high-capacity solution.
Experience signal: Building the cubbies slightly wider than a standard fabric storage bin means you can always add or remove bins as your needs change — flexibility that a fixed-drawer design doesn’t give you.
Pro tip: Build the frame 1 inch shorter than your mattress on each side so the mattress overhangs slightly and hides the frame edge.
Cost: $80–$150 in materials depending on timber grade and size. [Web-verified: April 2026]
12. Woven Basket Gallery with Bed Skirt

What it is: Fill the under-bed space with matching woven baskets or natural rattan trays, then add a bed skirt to conceal everything neatly.
Why it works: This is the most visually polished solution in the list. The bed skirt does the heavy lifting — everything underneath can be purely functional without any aesthetic pressure.
How to do it: Measure the clearance and source flat woven baskets (hyacinth, seagrass, or rattan) that fit with an inch to spare. Attach a bed skirt to the box spring or platform base. Assign a basket per category — shoes, scarves, charging cables, books.
Best for: Bedrooms where aesthetics matter as much as storage, guest rooms, shared spaces.
Experience signal: Designers consistently find that choosing one basket material and sticking to it — all rattan, or all seagrass — gives the under-bed area visual coherence even when you look underneath.
Pro tip: Label the baskets on the inside of the front lip, not the outside — you’ll know what’s in each one but it won’t ruin the clean look.
Cost: $10–$40 per basket; bed skirt $15–$35. [Web-verified: April 2026]
13. Repurposed Suitcase Storage
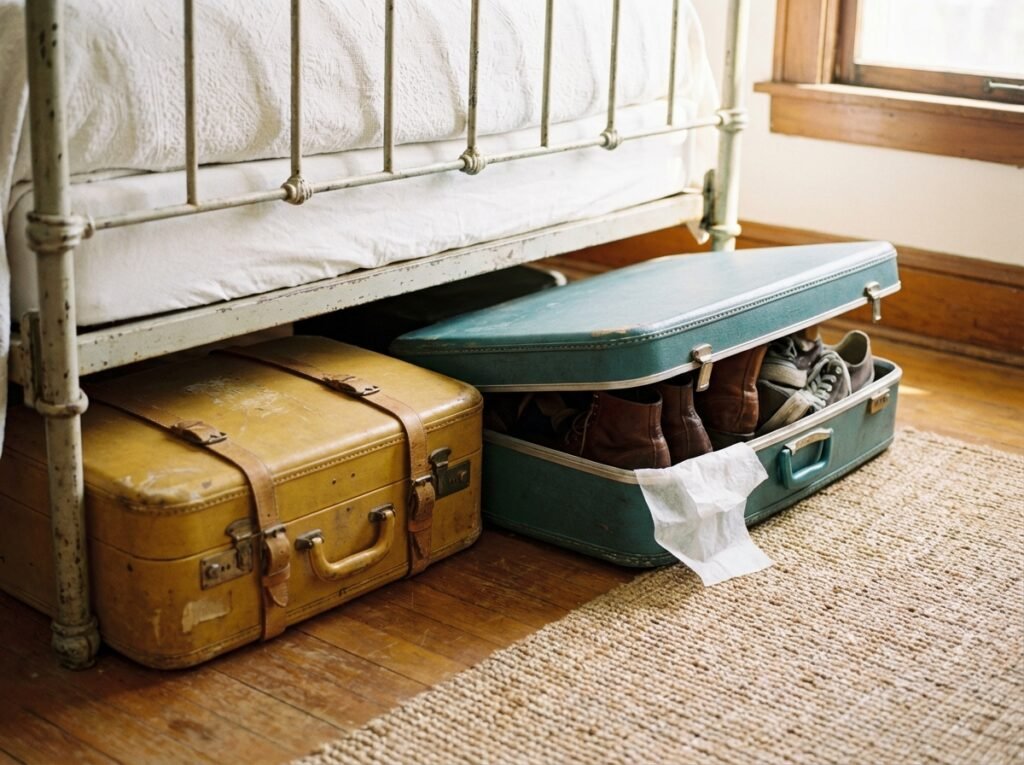
What it is: Use old or secondary suitcases as under-bed storage containers — filling them with seasonal items and sliding them under the frame.
Why it works: Suitcases are already designed to travel and be stored. They’re dustproof, often have compartments, zip shut, and usually fit under beds perfectly. And they double as luggage when you need them.
How to do it: Identify suitcases you own but rarely use. Fill with seasonal clothing, off-season shoes, or bulky items like spare blankets. Slide them under the bed on their wheels. Label the outside with a luggage tag.
Best for: Anyone who already owns suitcases taking up closet space, frequent travellers, guest rooms.
Experience signal: People who store seasonal wardrobes in suitcases find an unexpected bonus — when the season changes, unpacking is already half done, because everything is in a container you’re used to moving.
Pro tip: Pack in layers with a dryer sheet at the top. It keeps stored clothing fresh and wards off the musty smell that can develop in enclosed luggage.
Cost: $0 if you own spare suitcases. Otherwise, check thrift stores for $5–$20 options. [Web-verified: April 2026]
14. DIY Trundle Storage Unit (Box on Wheels)
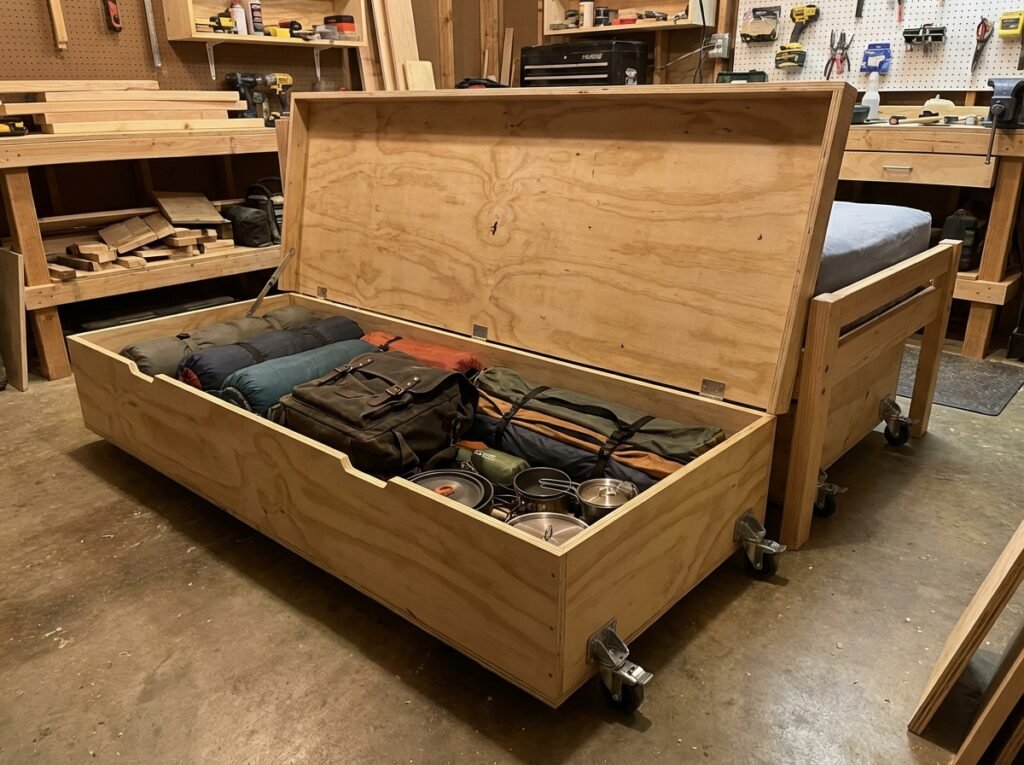
What it is: Build a deep rolling box — a trundle — from plywood that slides completely under the bed and pulls out when needed. Larger and taller than a standard drawer.
Why it works: A trundle gives you the full depth of the under-bed space in one unit. Think of it as a hidden chest of drawers on wheels — when you pull it out, you get access to everything at once.
How to build it: Cut a plywood base and four tall sides (height = your clearance minus ½ inch for wheel height). Attach sides with screws and glue. Add six or more heavy-duty swivel casters rated for the weight you plan to carry. Finish with paint or stain. Add rope handles at both ends.
Best for: Bulky items — sleeping bags, camping gear, spare pillows, off-season coats.
Experience signal: Six casters instead of four is the detail most people miss on first builds. A large trundle on four casters often binds in the middle when full — six casters distribute weight evenly and prevent warping.
Pro tip: Build it 2 inches shorter than the full width of the under-bed space so you can slide it in and out slightly diagonally if needed.
Cost: $30–$60 in materials. [Web-verified: April 2026]
15. Pallet Wood Rolling Tray
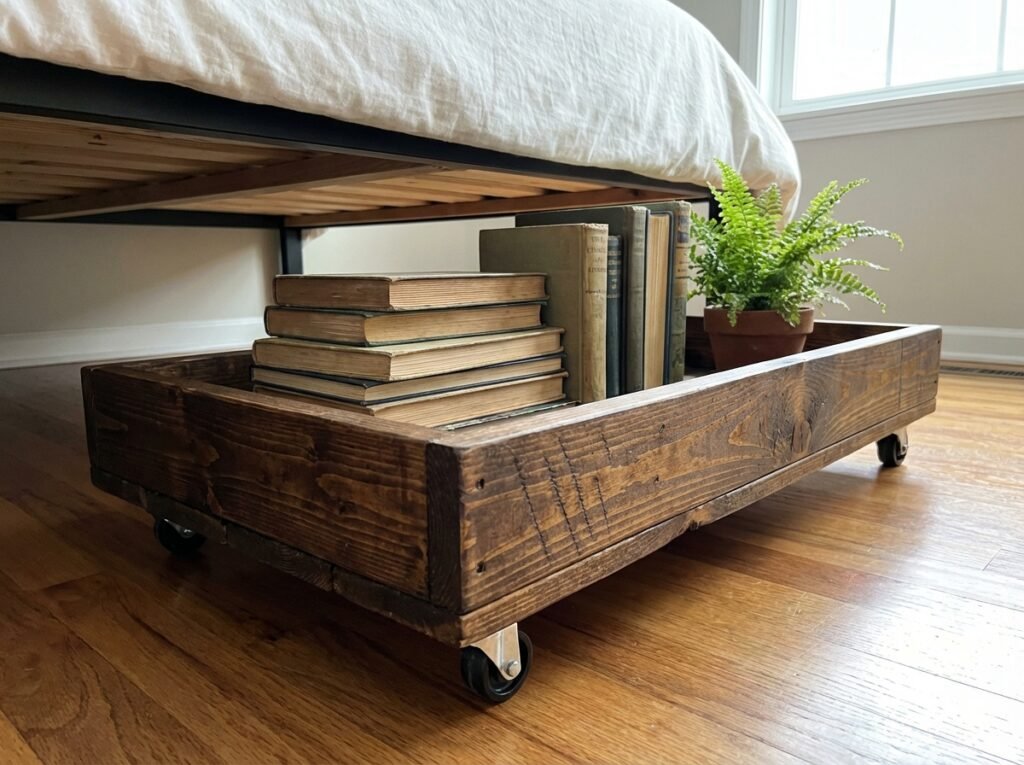
What it is: Disassemble a wooden pallet and reuse the planks to build a shallow, open rolling tray — the rustic under-bed equivalent of a wine rack.
Why it works: Pallet wood is free. With light sanding and a coat of wax or stain, it looks genuinely beautiful — the kind of rustic-industrial finish that costs a lot to buy and nothing to DIY.
How to build it: Source a clean, heat-treated pallet (look for the HT stamp — avoid MB-treated pallets, which were treated with chemicals). Disassemble with a pry bar. Sand all planks to remove splinters. Build a simple rectangular frame and base from the planks. Attach casters. Seal with clear wax or wood oil.
Best for: Shoes, baskets, seasonal items — anything that benefits from a breathable slatted base.
Experience signal: The HT versus MB stamp distinction trips people up every time. Heat-treated pallets are safe indoors. Methyl bromide-treated ones are not — they off-gas a pesticide. The stamp is always on the side of the stringer.
Pro tip: Don’t skip the sanding step. Un-sanded pallet wood catches fabric and causes snags.
Cost: $0–$10 (pallet often free; stain and casters $5–$10). [Web-verified: April 2026]
16. Wire Mesh Basket with Rope Handle
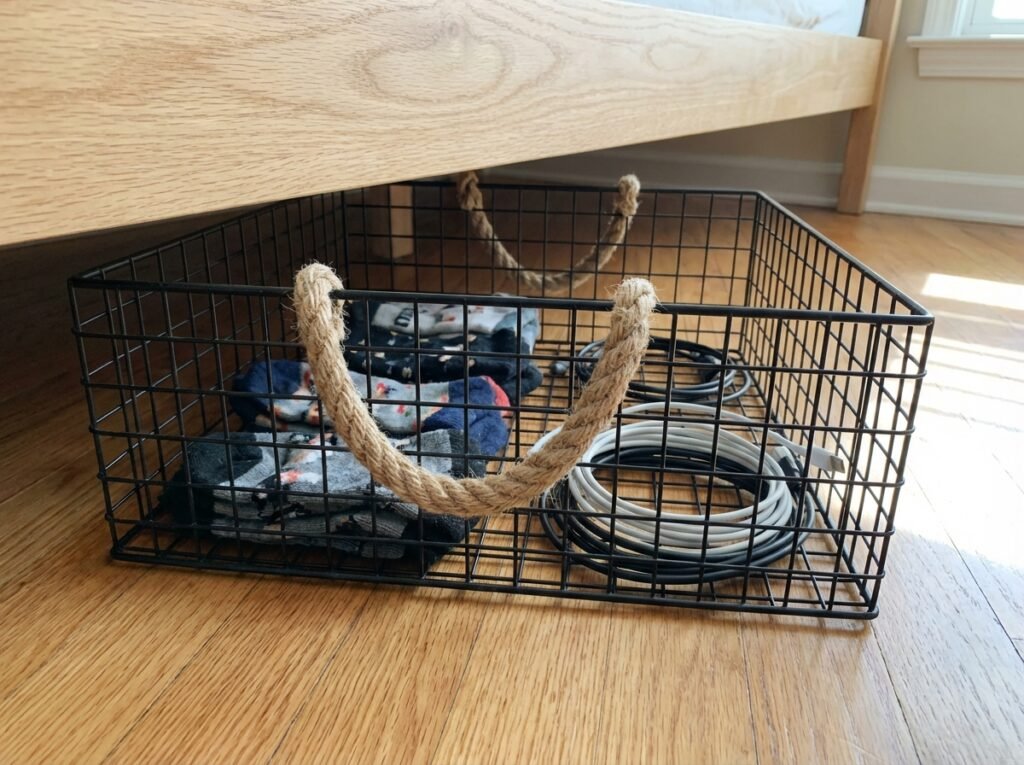
What it is: Mount a short rope handle through the front of a shallow wire mesh storage basket to create an easy-pull under-bed bin.
Why it works: Wire mesh baskets are lightweight, often collapsible, and — critically — you can see through them at a glance. No labelling required. No opening lids. Just pull and see.
How to do it: Buy a low-profile rectangular wire mesh basket (under 5 inches tall). Thread a 12-inch loop of rope or thick cord through two holes at the front. Knot securely on the inside. Optional: hot-glue a piece of felt to the base so it slides without scratching floors.
Best for: Frequently accessed items — socks, accessories, tech cables, kid’s toys.
Experience signal: See-through wire baskets are consistently rated as the best option for items accessed multiple times per week — you never have to remember what’s in which container.
Pro tip: For carpet floors, skip the casters and rely on the rope handle. Casters on carpet are more friction than they’re worth.
Cost: $10–$25 per basket plus $2–$4 for rope. [Web-verified: April 2026]
17. IKEA TROFAST Rail System Adapted for Under-Bed
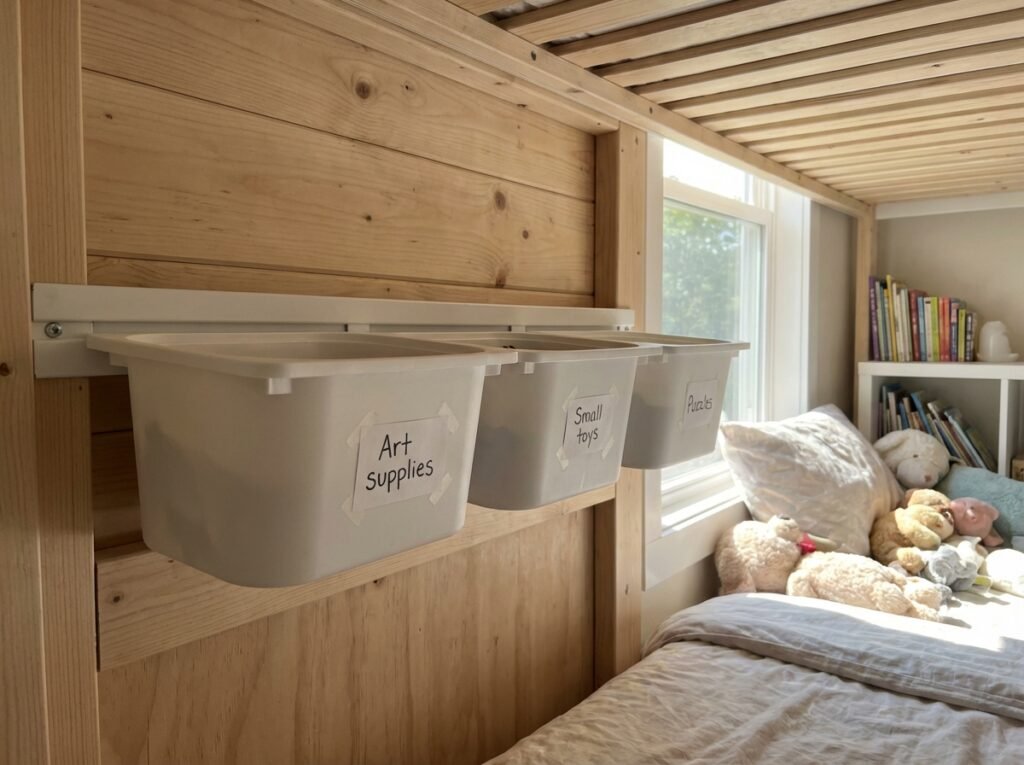
What it is: Mount IKEA TROFAST wall rails horizontally under a raised bed frame, then hang TROFAST bins from the rails like drawers.
Why it works: The TROFAST system is designed for wall mounting in kids’ rooms — but the rail-and-bin mechanism translates perfectly to under-bed use when mounted on the inside face of a bed frame. The bins click in, pull out, and lock back in place.
How to do it: This requires a bed frame with interior faces to mount to — works well with DIY platform builds or certain IKEA bed frames. Screw TROFAST rails horizontally to the interior frame sides at the correct height for your chosen bin size. Hang TROFAST bins from the rails. Each bin holds approximately 10–12 litres.
Best for: Kids’ rooms (toys, art supplies, small books), hobbyists with lots of small-category items.
Experience signal: Parents who use this system in kids’ rooms consistently note that the click-in design means the bins get returned to their spot correctly — unlike loose bins that end up shoved in randomly.
Pro tip: Label each TROFAST bin on the front face with a label maker. The system’s modularity only works if items stay in their designated bin.
Cost: TROFAST rails ~$15–$20 per set; bins $5–$10 each. [Web-verified: April 2026]
[Link opportunity: ‘TROFAST’ → IKEA product page or affiliate]
[Affiliate disclosure required if this link is monetised — add site-wide or inline disclosure before publishing]
18. Shoebox Drawer System with Contact Paper
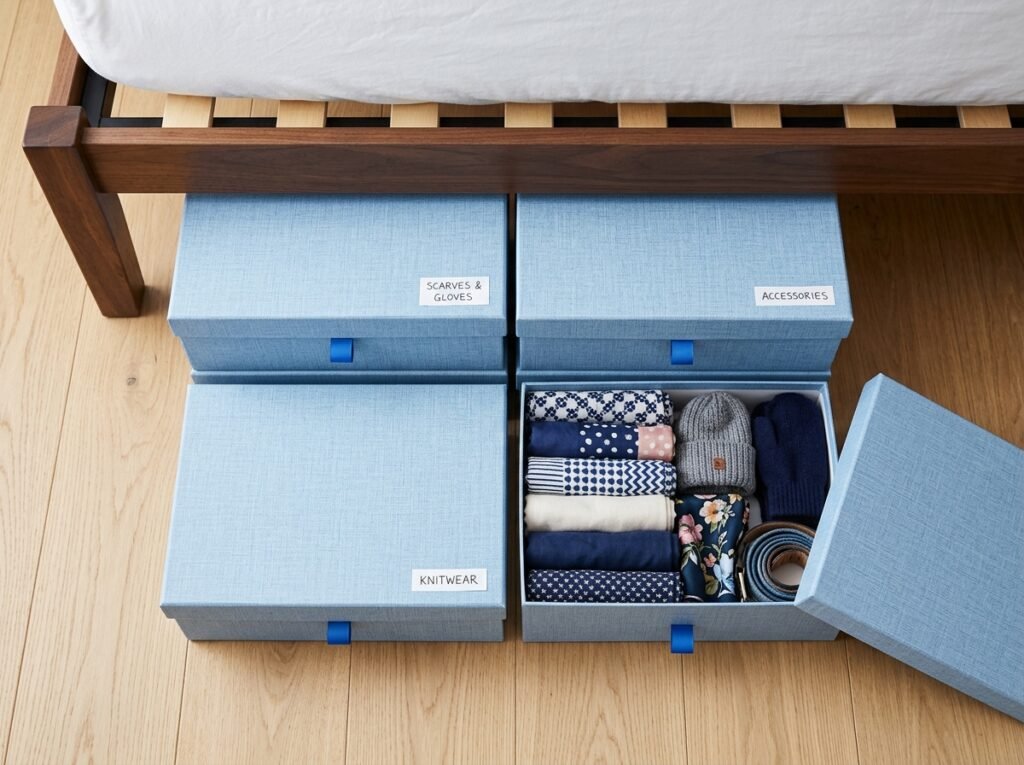
What it is: Wrap empty shoeboxes in coordinating contact paper and use them as a modular under-bed drawer system — completely free.
Why it works: Shoeboxes are already the right depth for storing folded clothing, accessories, or documents. Wrapped in contact paper, they look intentional and smart. Stack them two deep if your clearance allows.
How to do it: Collect shoeboxes (sturdy ones — thicker cardboard, not flimsy). Reinforce the base inside with packing tape. Wrap the exterior in contact paper — the same pattern across all boxes ties them together visually. Add a ribbon or washi tape pull-tab to the front of each box.
Best for: Accessories, craft supplies, documents, cables, small folded items.
Experience signal: People who’ve built full shoebox systems consistently note that the key is committing to one contact paper pattern across all boxes — a mix of patterns looks chaotic, but a uniform finish looks deliberate.
Pro tip: Write the contents on the inside of the lid so you can check without pulling everything out.
Cost: $0 if you have shoeboxes; contact paper $5–$10 per roll covers 8–10 boxes. [Web-verified: April 2026]
19. Bookshelf-as-Bed-Leg Hack
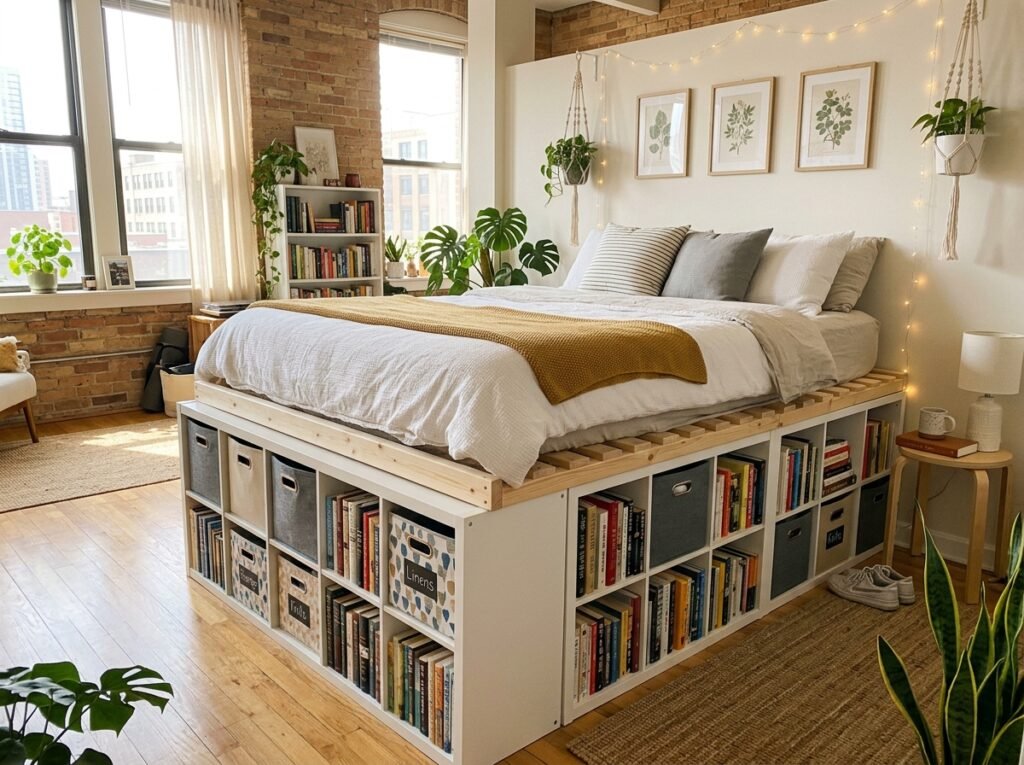
What it is: Lay two identical bookshelves on their sides (spines down, open faces out) and build or rest a bed frame across them — the shelves become the storage base.
Why it works: This is one of the highest-storage-density hacks in the list. You get six to eight open cubby bays per bookshelf, each large enough to hold fabric bins, baskets, or directly stored items.
How to do it: Choose identical bookshelves (IKEA KALLAX or BILLY work well). Lay them on their backs so the open shelving faces out from the sides of the bed. Lay a sheet of plywood across the top to create the bed platform. Secure the plywood with L-brackets to the shelf units. Add a mattress.
Best for: Maximum-storage builds, studio apartments, people replacing a dresser with under-bed storage.
Experience signal: This build consistently yields the most positive before/after reactions of any under-bed hack — people are regularly surprised at how solid and intentional it looks once the bedding is on.
Pro tip: Use KALLAX over BILLY for this hack. KALLAX is cubic-format and self-supports horizontally much better than BILLY’s rectangular shelves.
Cost: $60–$200 depending on bookshelf size and plywood. [Web-verified: April 2026]
20. Upholstered Storage Box on Casters
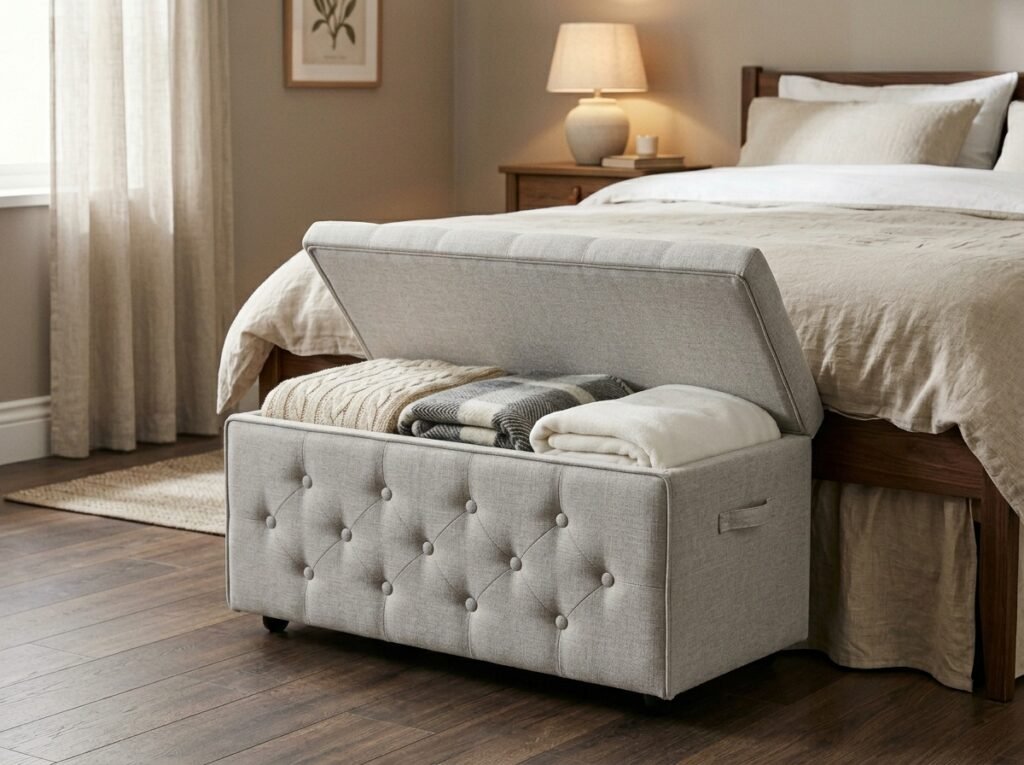
What it is: Build a simple plywood box, wrap it in foam and fabric for an upholstered finish, and mount it on casters as a rolling under-bed storage unit.
Why it works: This is the storage solution that looks like furniture, not storage. Pull it out from under the bed and it reads as a decorative ottoman or bedside box — not an improvised bin.
How to build it: Cut plywood into a box (base, four sides). Attach with glue and screws. Cut 1-inch upholstery foam to size for each exterior panel. Spray-adhesive the foam to the panels. Stretch your fabric choice (linen, velvet, bouclé) over the foam and staple gun it to the interior of each panel. Add casters to the base.
Best for: Bedrooms where aesthetics matter. Guest rooms. Studios where under-bed storage might occasionally be seen.
Experience signal: Velvet catches dust more than linen or canvas — for frequently accessed rolling storage, linen is the more practical fabric choice even though velvet photographs better.
Pro tip: Leave the top of the box open rather than adding a lid — it’s faster to access and reduces the chance of the lid warping over time.
Cost: $30–$60 in materials. [Web-verified: April 2026]
21. DIY Tension Rod Under-Bed Divider System
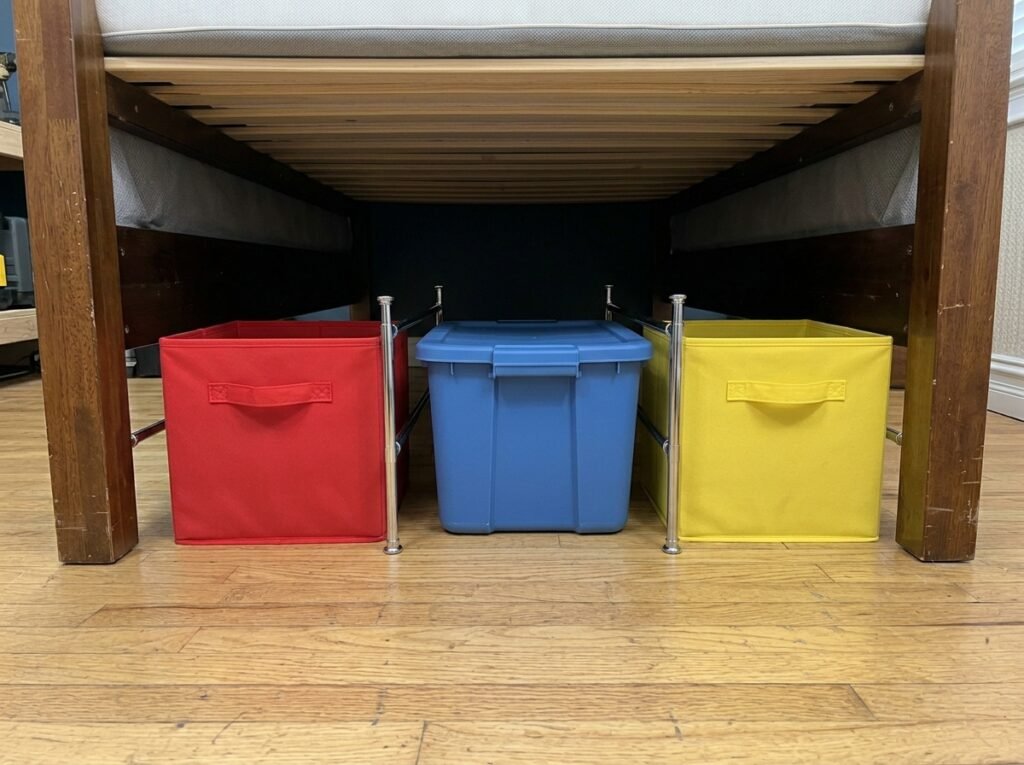
What it is: Install adjustable tension rods horizontally across the under-bed space to create lanes that keep storage containers organised and prevent them from drifting.
Why it works: Bins and baskets under the bed gradually migrate — especially on hardwood floors. Tension rods create fixed lanes that keep everything in its assigned place without any permanent installation.
How to do it: Measure the interior width of your under-bed space. Buy tension rods slightly longer than this measurement (so they press firmly against the frame supports). Install one rod at the front and one at the back of each lane you want to create. Place your containers between the rods.
Best for: Anyone using multiple different-sized containers who wants them to stay organised.
Experience signal: This is the hack that under-bed organisers credit for making their system actually stay tidy week-to-week — without lane dividers, containers drift into each other and the whole system degrades within a month.
Pro tip: Use chrome tension rods rated for bathroom use — they’re stronger than décor rods and have a better grip on smooth surfaces.
Cost: $5–$12 per rod. Two to four rods usually does the job. [Web-verified: April 2026]
22. Hanging Pocket Organiser Under Slatted Base

What it is: Attach a hanging fabric pocket organiser (the kind usually hung over doors) to the underside of a slatted bed base, creating pockets of storage accessible from the side of the bed.
Why it works: Works for beds with virtually zero clearance — because the storage hangs from the slats rather than sitting on the floor. Perfect for ultra-low platform beds.
How to do it: Buy a flat over-door hanging organiser with clear or fabric pockets. Slip the top hem loops over two or three slats near the edge of the bed. The pockets hang down in the clearance space and are accessed from the side of the bed.
Best for: Small, frequently-used items — phone chargers, small books, remotes, glasses, hand cream.
Experience signal: This is genuinely the only reliable solution for beds with under 3 inches of floor clearance — and it’s the most underused hack in the list because most people don’t think to look up rather than across.
Pro tip: Use over-door organisers with individual pockets rather than open shelves — the pockets hold items in place even if the organiser shifts.
Cost: $10–$25 for the organiser. [Web-verified: April 2026]
23. Repurposed Milk Crate Rolling System
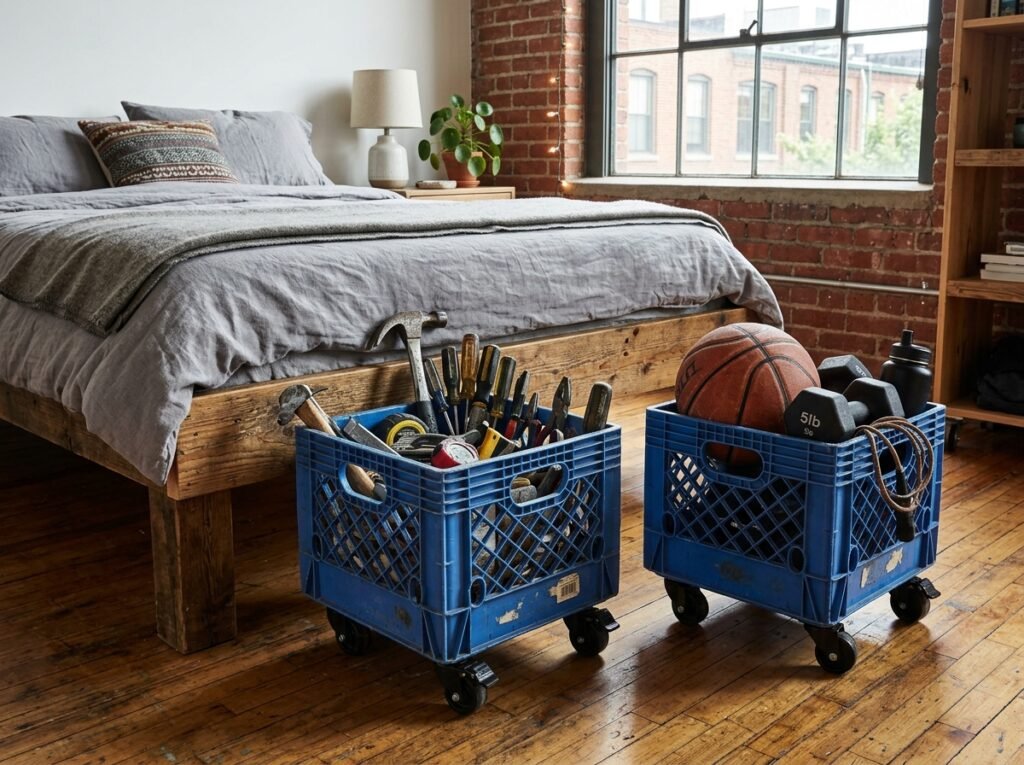
What it is: Mount plastic milk crates on casters for rolling storage bins with a sturdy, structural feel.
Why it works: Milk crates are designed to carry heavy loads. They’re ventilated, stackable in pairs if clearance allows, and incredibly durable. They read as slightly industrial but in a functional, honest way.
How to do it: Source plastic milk crates (check restaurant supply stores, online marketplaces, or surplus stores — never take commercial crates from businesses, as these are company property). Drill four small holes at each base corner. Bolt low-profile casters through the holes. Optional: paint with spray paint formulated for plastic.
Best for: Heavier items — tools, sports equipment, shoes, books, canned goods for studio apartments.
Experience signal: Milk crates consistently outperform most DIY storage options for sheer load-bearing capacity. They’re built to carry glass milk bottles in industrial quantities — your shoes present zero challenge.
Pro tip: Use M5 bolts and nylock nuts when attaching casters — regular nuts vibrate loose over time from being rolled in and out repeatedly.
Cost: $5–$15 per crate; $5–$10 for casters per crate. [Web-verified: April 2026]
24. Magnetic Chalkboard-Label Fabric Storage Cubes
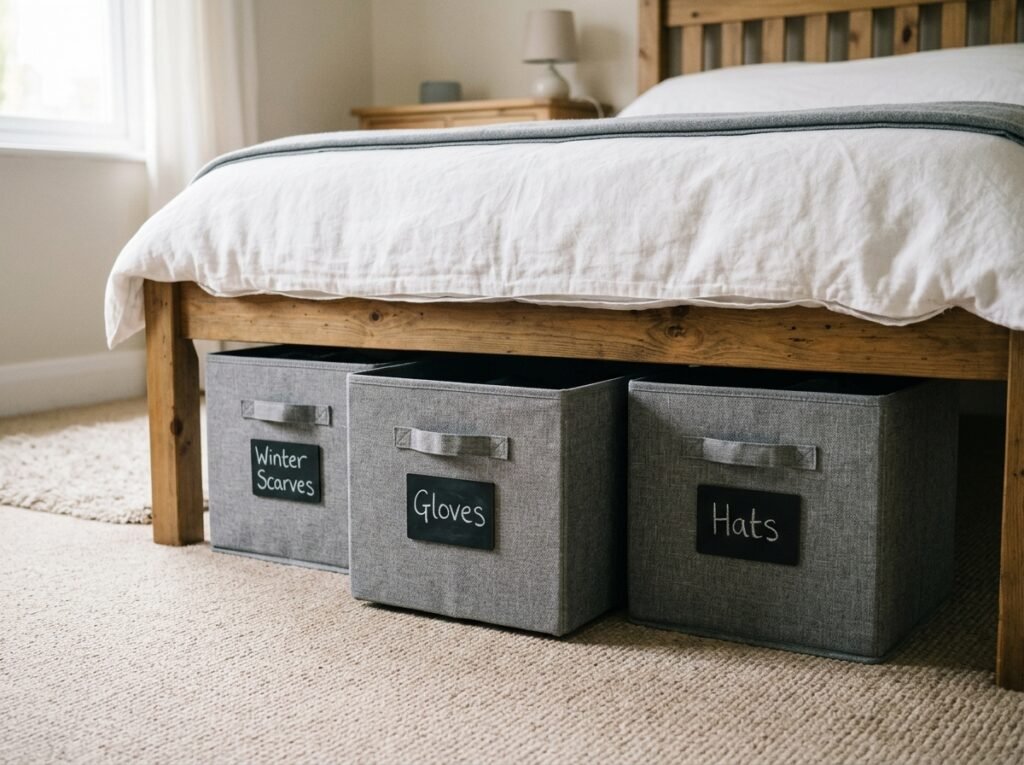
What it is: Buy collapsible fabric storage cubes and attach a small magnetic chalkboard label to the front face of each one — so the contents can be re-labeled any time.
Why it works: The organisational challenge of under-bed storage isn’t usually building the system — it’s maintaining it when what you store changes seasonally. Re-writable labels mean the system adapts without any rework.
How to do it: Buy flat-sided collapsible fabric cubes that fit your clearance height (typically 5-inch or 6-inch options work for most beds). Hot-glue a small rectangular magnetic chalkboard to the front face. Label each cube with chalk — write the contents, category, or season.
Best for: Seasonal systems — rotating summer/winter wardrobe, holiday decor storage.
Experience signal: Re-labelable magnetic chalkboards are consistently cited as the detail that makes organisational systems stick long-term — static labels invite chaos because people ignore labels that are ‘wrong’ rather than replacing them.
Pro tip: Slightly dampen the chalkboard before the first use (this is called seasoning) to prevent permanent ghost marks when you erase.
Cost: $8–$15 per fabric cube; chalkboard magnets $6–$12 for a set. [Web-verified: April 2026]
25. DIY Hydraulic Lift Platform Bed
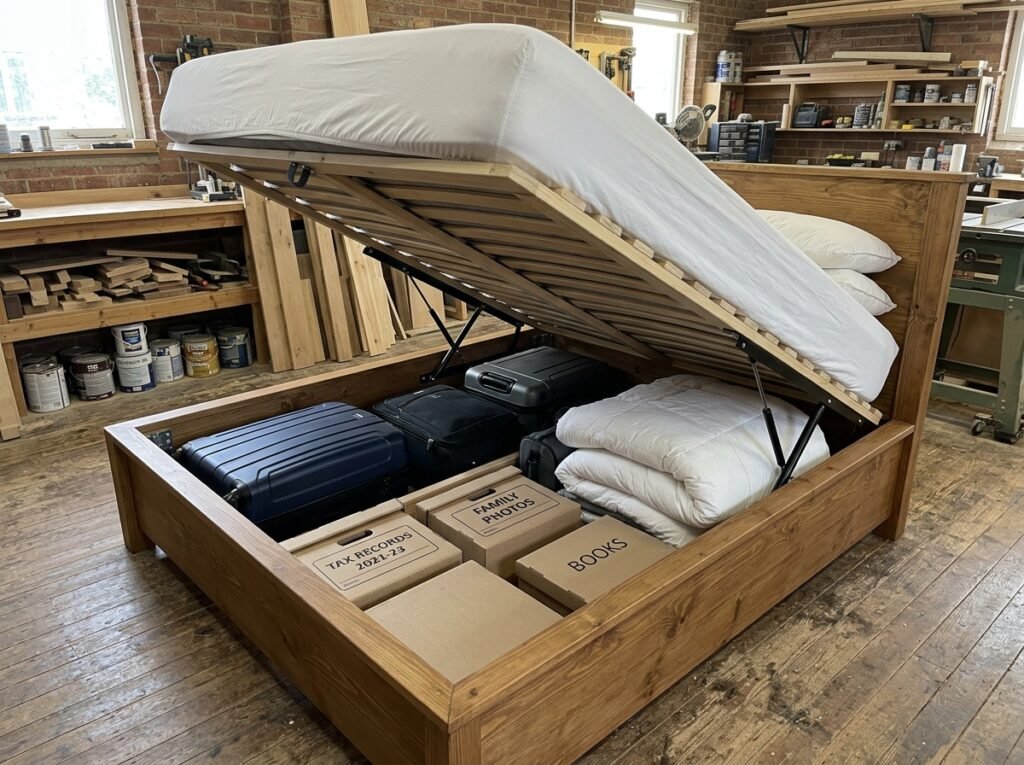
What it is: Build or retrofit a bed frame with a gas-lift hydraulic mechanism that raises the entire mattress platform on hinges, revealing a full-depth storage area beneath.
Why it works: This is the highest-capacity solution on the list — the entire interior of the bed frame becomes accessible storage. A queen-size hydraulic lift bed can store suitcases, camping gear, archive boxes, and bulk bedding simultaneously.
How to do it: Purchase a hydraulic gas lift mechanism kit (these are sold specifically for bed builds — search ‘bed hydraulic lift mechanism’). Build a box bed frame from 3/4-inch plywood at your desired height (10–14 inches is typical). Attach the lift arms at the head of the bed per the kit’s instructions. Mount the mattress platform on the lift. Test with weight before adding bedding.
Best for: Maximum storage, studio apartments, guest rooms, people who need to replace a full wardrobe’s worth of storage.
Experience signal: Those who’ve built hydraulic bed lifts consistently report that the build takes a full weekend but the result is so transformative — adding the equivalent of a full chest of drawers — that every hour was worth it.
Pro tip: Build in a support leg or prop rod that locks the platform open while you’re loading or retrieving — hydraulic lifts can slowly descend if the mechanism isn’t top-quality.
Cost: Lift mechanism kit $60–$130; plywood and hardware $80–$150. Total project: $140–$280. [Web-verified: April 2026]
Frequently Asked Questions
Q: How do I know what clearance I have under my bed?
Get on your knees and slide a ruler or measuring tape under the bed frame — measure from the floor to the underside of the frame, not the mattress. Do this in a few spots (centre and each side) because frames aren’t always level. Write down the lowest measurement — that’s your constraint. If you’re under 4 inches, look at ideas 9, 10, and 22 in this list specifically. If you’re between 5 and 7 inches, the majority of ready-made bins and most DIY drawers will work.
Q: What should I not store under my bed?
Avoid storing anything that needs airflow and can’t handle dust — unsealed food, open electronics, or delicate fabrics stored loose (without covers or bags). Heavy items are also a practical issue: if pulling them out requires significant physical effort, you’ll stop using the storage. Items over 30 lbs per bin should have good-quality casters rated for that weight. Finally, avoid storing things you access daily — under-bed is best for weekly or seasonal access, not daily reach-in items.
Q: How do I keep under-bed storage from getting dusty?
Use lidded containers, zip-up fabric bags, or zippered canvas bags for anything textile. For open containers (bins, crates, trays), store items inside fabric bags before placing them in the container. A fitted bed skirt helps enormously — it limits the air circulation that carries dust under the bed in the first place. If you’re on hardwood or tile floors, vacuum or sweep under the bed once a month; on carpet, every two months. Rotating your storage seasonally also naturally resets any dust buildup.
Q: Can I use under-bed storage in a rental without making permanent changes?
Yes — most ideas in this list require no permanent modifications. Bed risers, rolling bins, fabric bags, tension rods, over-door pocket organisers (repurposed for under-bed slats), crate systems, and all free-standing units leave no marks and move with you. The only ideas that involve any drilling or structural changes are the platform bed builds and the TROFAST rail system. Everything else is renter-safe out of the box.
Q: How much under-bed storage space does a standard queen bed have?
A standard queen mattress is 60 by 80 inches. If your clearance is 6 inches, your total under-bed volume is roughly 60 x 80 x 6 inches — about 28,800 cubic inches, or close to 470 litres of potential storage space. In practical terms, that’s the equivalent of two to three large dresser drawers per side. Most people use only 40–50% of this space effectively. Getting the full 470 litres usually requires thoughtful zone planning: front lanes for frequently accessed items, back lanes for seasonal storage.
Q: What’s the best DIY under-bed storage idea for a complete beginner?
Start with idea 2 — the IKEA basket plus caster wheels hack. You need zero tools, zero skills, and about ten minutes. The materials cost under $15 and the result is genuinely functional. Once you’ve done that and understand what you’re working with (your clearance, your floor type, how often you actually access the storage), you’ll have a much better sense of whether you want to build something more permanent. Beginners consistently say starting simple and upgrading later beats overthinking before doing anything at all.
Those 25 ideas cover every clearance height, every budget from zero to a full weekend build, and every skill level from ‘I own scissors’ to ‘I’m comfortable with power tools.’ The point isn’t to do all 25 — it’s to pick the one that matches your actual bed, your actual space, and the things you actually need to store.
If you only do one thing from this list, do idea 2 first. It costs under $15, takes ten minutes, and immediately shows you whether under-bed storage is going to change how your bedroom functions. Most people who start there end up doing at least one more idea within a week.
Measure your clearance. Pick one idea. Start this weekend — not someday.